|
Starter Project
This is perhaps the easiest, and least expensive camera projects to
build. It involves encasing a spy camera in a polymer inside a clear
plastic box, that doubles as a mold, lens and housing.
Materials Needed
- One camera. Try getting supercircuits.com PC
166XS, or these less expensive models; PC 33XP, PC 300XS both $11.95;
PC 302XP, PC 302XS both are good quality CCD units and a bit more
expensive.
- 50 feet of video cable with RCA connectors,
they vary, get one that matches your unit. Supercircuits' Model #
EXT-POW-50 matches PC 166XS camera. An alternative is to purchase the
cable on your own and solder the plugs yourself. Shielded cable can be
purchased at Home Depot, and the plugs are available at Radio Shack,
both at very reasonable prices.
- A clear plastic box at least 1 1/2 "(3.8 cm) X
1 1/2" X 1 1/2". A suitable box is a display case used to house
expensive collectibles such as Beenie Babies, rare Matchbox cars... Try
hobby shops, or arts and crafts stores.
- One monitor, or any TV with RCA receptacles.
Due to the popularity of video games these are common on many portable
DVD players. If you have a portable TV with a coaxial cable connection
RFU unit costing $7 can be adapted to it. If you choose the latter you
don't need RCA plug. More on this later. A 12 volt battery.
|
Supplies
- One 8 oz (228 ml) epoxy compound or
polyurethane compound kit. Found at hobby shops, hardware stores, or
fiberglass supply outlets.
- One small tube of clear silicone sealant.
- Heat shrinking tubing.
- Roll of electrical tape.
- Pair of latex gloves.
- Dozen toothpicks.
- Old newspapers.
- Rags or paper towels, and cleaning solution.
Fabrication
Always
test your camera prior to casing it in polymer. Read the manufacturer's
instructions and follow the guidelines. Not all spy cameras will work
off a 12 volt power supply, some are rated for 9 volts. Next read the
section on adjusting the focus on your camera model. you want the focus
to be sharp when objects are 6"(15 cm) from the lens. once you have
completed these steps you are then ready to cast the polymer.
Spread
the newspapers over your work area. Wear your latex gloves. Dispose of
excess compound after it hardens.
First
strip the ends of wires. Then cut off the sections of heat shrinking
tubing and insert them in the wires. Next twist the two ends together
so they lay flat, clip ends off, and solder the splices. Last slip the
heat shrinking tubing over the splices and apply heat using a blow
dryer, heat gun or other source.
To
begin the waterproofing process, insert the camera inside the plastic
case, and make sure the spliced wires fit inside the box.
If
the case is too small and the splices hang out, then you need to solder
the wires directly to the camera.
Practice
positioning the camera inside the box prior to casting the compound.
The box should have no beads on the side used as a window. Usually
display cases are well made of clear plastic without any beads, cheap
containers will have have beads and other imperfections. Then apply a
small bead of silicone on the flat ring around the camera lens. If you
apply too much silicone it may smear on to the lens and diminish your
viewing area. Best results if you use toothpicks dipped in silicone for
this application.
Next
insert the camera in the box pressing the camera lens against the
bottom, making sure not to move it in any direction as this will smear
the silicone, and wait for the silicone to dry. This may take an hour.
The silicone bead will not only fix the camera to the box but will also
prevent the compound from flowing into the lens.
while
you are waiting for the silicone to dry out, read the instructions on
the compound package. Start mixing the polymer only after the silicone
has cured. Immerse the camera and spliced wires thoroughly. Leave the
project to cure at room temperature overnight.
If
you did everything according to plan your camera should perform like
the expensive models. always slip the case inside a cloth bag as it
will scratch easy.
You'll
need to fabricate a bracket for this camera see the next section for
more details.
To
use this camera at night strap on a waterproof flashlight.
|
 My
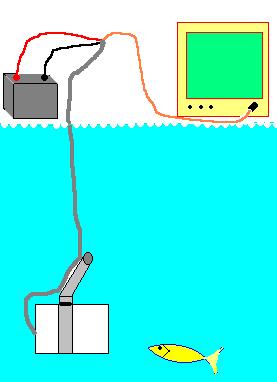
Underwater Camera Projects My
Underwater Camera Projects
I
have built several underwater cameras. The one in the picture to the
right cost me $30 to build.
I took apart a child's toy which I bought at a swap meet for $2. The
housing was built of PVC with Lexan lens. Downwire was made of cheap
communication cable bought at Home Depot. Aluminum strap was cut and
bent to make an adjustable bracket, picture below shows greater detail.
The bracket is secured to the downline at two or more points. The
camera can be pivoted up or down by loosening the nut, allowing the
user to pointed down, to check river bed, or up to check a hull. One
can also attach this camera to a fixed point such as in security
applications, or the hull of a ship for wide area searches.
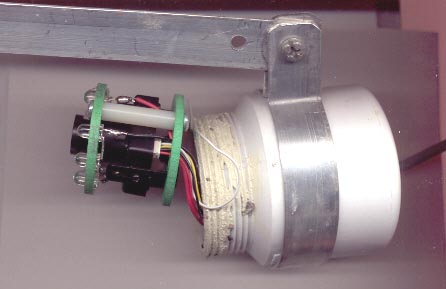 How
The Camera Housings Are Made How
The Camera Housings Are Made
To
fabricate the camera housing's window for a 1 1/2 inch PVC pipe, buy a
sheet of clear acrylic cut it with a 1 7/8 (48 mm) MASTER
MECHANIC circle cutter . You'll find one of these at True
Value Hardware Stores , in the USA. To cut the lens using the
circle cutter you'll also need a drill press. Drilling it by hand will
definitely ruin your work and possibly injure you.
For
the 2 1/2 inch pipe it gets trickier you need the 2 1/2" (64 mm).
 I
also used a jig saw once. A circle was traced on to the acrylic's
(polycarbonate, Lexan) protective covering, then cutting out the
pattern. Filing was required to fit the piece into the pipe. If you are
a craftsman with power tools, try the circle cutter. It will save you a
lot of aggravation. I
also used a jig saw once. A circle was traced on to the acrylic's
(polycarbonate, Lexan) protective covering, then cutting out the
pattern. Filing was required to fit the piece into the pipe. If you are
a craftsman with power tools, try the circle cutter. It will save you a
lot of aggravation.
Everything
else is made of PVC pipe. Cut with a jig saw but a hacksaw will do. I
smooth all my endcuts by running them over a sheet of sandpaper laid
out flat on a smooth surface.
Most
of my camera projects are serious treasure hunting tools which can also
be used to spot fish, inspect hulls, bridges, dams, wells...
I use one of these spy cam available
online, Camera units start at $11.95.
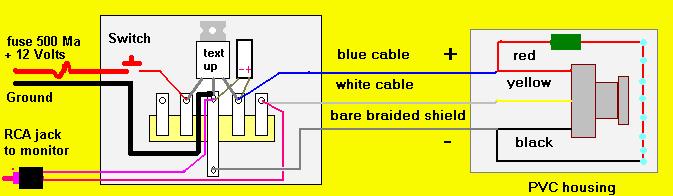
Electronics
are easy. If you can solder you can build it. Components are soldered
onto a 5 lug terminal strip. Find out how to build a top of the line
camera, Underwater
Camera Plans
|
|